
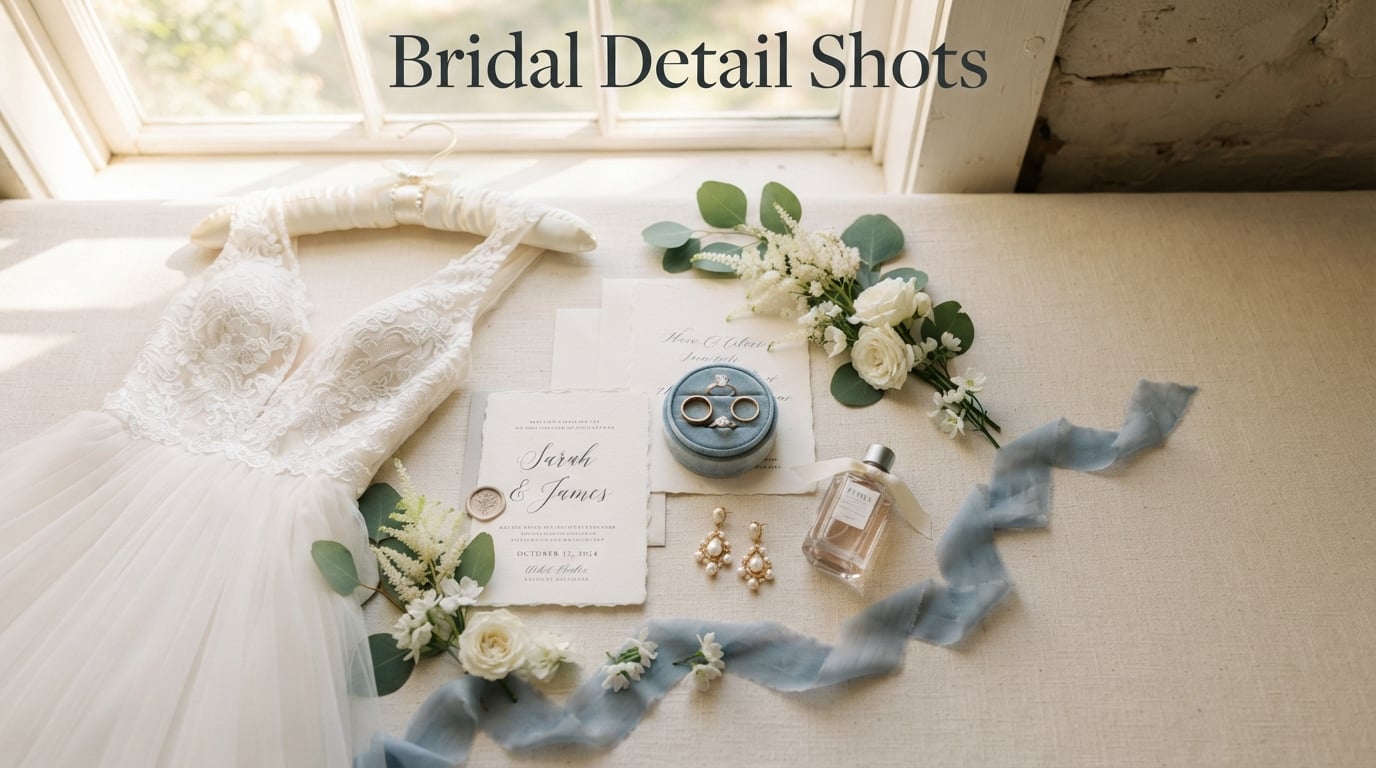
Bridal detail shots are the close-up photographs that capture the small, personal items a bride spends months choosing for her wedding day. These images preserve the dress, rings, jewelry, shoes, and sentimental keepsakes that tell the full story of the celebration. When I look back at the albums our team has designed over the years, the detail shots are almost always the spreads that couples linger on longest.
On this page, you will learn exactly what bridal detail shots are, which items to include, when to photograph them, how long to budget for them, and how to use lighting and styling to get magazine-quality results. I will also cover groom details, the all-important wedding details box, and the most common mistakes we see couples and newer photographers make.
Bridal detail shots often feel like an afterthought when couples are rushing through a wedding day timeline, but they are the thread that ties an album together. They capture the things you will forget you owned five years from now, and the things family members will treasure for decades. Treat them as essential, not optional.
Table of Contents
What Are Bridal Detail Shots?
Bridal detail shots are close-up, carefully styled photographs of the personal objects, accessories, and sentimental items associated with a bride’s wedding day. They cover everything from the wedding dress and rings down to the perfume, the invitation suite, and a grandmother’s brooch. Photographers use natural light, macro lenses, and flat lay compositions to make these small objects look intentional and elevated.
Detail shots sit alongside getting ready photos, ceremony coverage, and reception photography as one of the four core pillars of a wedding day gallery. They exist because couples spend an enormous amount of time and emotion selecting each piece of their wedding look, and those choices deserve to be documented with the same care as the first kiss.
One common point of confusion is that detail shots are only for the bride. They absolutely are not. Groom detail shots, family heirlooms, and even the wedding party’s personal items all fall under this category and we cover that more below.
Essential Items to Include in Bridal Detail Shots
The essential items to include in bridal detail shots are the wedding dress, all three rings, jewelry, shoes, the bouquet, the invitation suite, perfume, and any family heirlooms or sentimental keepsakes. I organize these into four groups so nothing gets missed on the wedding morning.
Here is the categorized checklist our team uses on every wedding day:
The Essentials
The dress is the centerpiece. We photograph it on a quality hanger, laid flat on a clean surface, and hanging against a textured wall or window light. Always ask the bride or planner where the dress is stored before you arrive so it does not get lost in a steamer bag.
All three rings should be photographed, not just the engagement ring. The wedding bands for both partners are easy to forget but always end up in the album. Ring shots work best with a macro lens and a small styling surface like a ring dish, a piece of ribbon, or the invitation itself.
Shoes, especially the bridal heels, deserve their own moment. Place them on a chair, on the invitation suite, or against the dress for a composed flat lay. Groom shoes, cufflinks, and watch belong in this section too.
Stationery and Paper Goods
The full invitation suite is one of the most photographable items on the entire wedding day. It includes the main invitation, the RSVP card, the envelope with calligraphy, any belly band or wax seal, and any additional inserts like directions or accommodation cards.
Vow books are an underrated detail. Even if the couple plans to read from them during the ceremony, photographing them early with the rings or ribbon creates a meaningful, textural image.
Menus, programs, and any custom signage can also be included, though these are typically photographed later in the day when they are displayed.
Jewelry and Accessories
Bridal jewelry includes earrings, necklaces, bracelets, hairpieces, and the veil. Photograph each piece individually and then as a styled group with the dress or invitation. A simple piece of velvet or silk as a background elevates these shots immediately.
The veil deserves special attention because it carries so much movement and texture. Hang it from a window frame, lay it across the dress, or photograph it backlit for a soft glow.
Perfume bottles and any cologne for the groom photograph beautifully next to the invitation suite or on a small tray. These small luxuries add color and reflect the couple’s personal scent choices.
Florals and Sentimental Items
The bridal bouquet should always be photographed as a detail shot, even though it also appears in portraits. Shoot it against a clean backdrop, lay it flat for a top-down view, and capture a close-up of any personal ribbons wrapping the stems.
Family heirlooms are often the most treasured images from a wedding day. A grandmother’s ring, a mother’s clutch, a lock of hair in a locket, a piece of fabric sewn into the dress. Ask the couple about these items during the engagement session so nothing is missed.
Sentimental photographs of deceased loved ones, a borrowed bible, a sixpence in the shoe. These details cannot be recreated and the bride will always be grateful they were captured.
When to Photograph Bridal Detail Shots
The best time to photograph bridal detail shots is at the very start of the wedding day, immediately after the photographer arrives at the getting-ready location. This is typically the first 30 to 45 minutes of coverage, before hair and makeup wrap up and the dress goes on.
Our team follows a simple rule. The first thing we do when we walk into the getting-ready room is ask where the details box is. If everything is gathered in one place, we can move to a quiet corner with good window light and start styling while the bride is still finishing her makeup.
This timing matters for two reasons. First, the bride is usually not camera-ready yet, so capturing the items without her in the frame keeps the gallery clean and focused. Second, once the dress goes on, the energy of the room shifts entirely and you rarely get a calm window again until after the ceremony.
If the bride wants detail shots of herself wearing certain items, like earrings or the veil, those get folded into the getting ready coverage a bit later. The standalone flat lay shots and ring shots happen first.
One thing newer photographers sometimes do is photograph details during the bride’s portrait session later in the day. That works as a backup, but the best lighting and the calmest environment are almost always in the getting-ready room at the very start.
How Long Do Bridal Detail Shots Take?
Bridal detail shots take between 30 and 45 minutes for a complete set, depending on how many items the bride has gathered and how organized they are when the photographer arrives. A bride with a pre-packed details box can be photographed in 20 to 25 minutes, while a bride who is still gathering items mid-morning can push this to a full hour.
Here is how the time typically breaks down on a well-organized wedding morning:
Ring shots take 10 to 15 minutes because they require a macro lens, careful styling, and precise focus. The dress on a hanger takes 5 to 10 minutes depending on lighting and backdrop options. The invitation suite flat lay takes 10 to 15 minutes because it involves composing multiple pieces and adjusting props. Jewelry and shoes together take another 10 minutes. Sentimental items and any quick creative shots fill the remaining time.
If you are a bride planning your timeline, budget 45 minutes for detail coverage even if you think you will only need 20. Buffer time is what protects the rest of your morning from running behind, and it gives your photographer room to be creative rather than rushed.
If you are a newer photographer feeling pressure about the 45-minute mark, remember that this is total time, not 45 minutes of continuous shooting. You will be moving items, looking for light, and styling between exposures. The actual shooting portion is much shorter.
One forum complaint I see often is that 45 minutes sounds excessive. It is not. When couples see the final gallery, the detail spread is what they tend to share most on social media and what wedding publications request first. The investment of 45 minutes pays back for the life of the images.
Lighting Tips for Stunning Detail Shots
The best lighting for bridal detail shots is soft, directional natural light from a large window. Position items at a 45-degree angle to the window so light sweeps across textures without creating harsh shadows or blown highlights.
Avoid overhead lighting at all costs. The ceiling lights in most hotel getting-ready rooms are tungsten, dim, and produce a yellow color cast that is painful to correct in editing. If natural light is limited, turn the overheads off and work only with what comes through the window.
North-facing and south-facing windows produce the most consistent, soft light throughout the morning. East-facing windows give beautiful warm light early in the day but lose it quickly. West-facing windows rarely help during a morning getting-ready session.
A simple white foam board or reflector is the single best tool for detail photography. Use it to bounce window light back onto the shadow side of the dress, the rings, or the invitation suite. This fills shadows without flattening the directional quality that makes detail shots look dimensional.
For low-light getting-ready spaces, which is a common pain point in older venues and small hotel rooms, move closer to the window, increase ISO rather than relying on flash, and use a wider aperture. Flash on small reflective objects like rings and jewelry tends to create hot spots and unnatural color. Natural light, even when dim, almost always produces better detail images.
Backlighting works beautifully for veils, dresses with lace or beading, and any translucent floral elements. Place the item between the window and the camera and expose for the highlights. This creates a soft glow that no artificial setup can replicate.
Styling Props and Flat Lay Techniques
Styling props elevate bridal detail shots from snapshots to magazine-quality images. The props our team brings to every wedding include a velvet styling mat in neutral tones, a silk ribbon roll, a small ring dish, a wood or marble tile, and a few sprigs of leftover florals from the bouquet.
The flat lay is the signature composition for wedding detail shots. To build a strong flat lay, start with a clean background like a wood table, a marble counter, or a piece of fabric. Place the largest item, usually the invitation suite or the dress, slightly off-center. Add smaller items like the rings, perfume, jewelry, and florals around it, leaving negative space so the composition breathes.
Texture is what separates a good flat lay from a great one. Mix smooth surfaces like the invitation paper with soft textures like velvet, silk, and floral petals. This contrast is what draws the eye in.
Color coordination with the wedding palette is a high-impact technique most beginners miss. If the wedding colors are dusty blue and cream, choose a styling background and ribbon that complement those tones. This makes the detail spread feel intentional and tied to the rest of the day.
For ring shots specifically, use a macro lens and a very shallow depth of field. Place the ring on a textured surface like the invitation, a piece of ribbon, or a floral petal. Focus carefully on the most reflective part of the stone and let the rest of the frame fall into soft focus.
One mistake I see often is over-styling. A cluttered flat lay reads as busy and pulls attention away from each individual item. Aim for three to five objects per composition, and if you want to photograph more items, build multiple smaller flat lays rather than cramming everything into one frame.
Groom Detail Shots: An Often Overlooked Essential
Groom detail shots are just as important as bridal detail shots and are one of the most overlooked parts of a wedding day gallery. They include the suit or tuxedo on a hanger, the dress shoes, the tie or bow tie, cufflinks, a watch, cologne, the boutonniere, and any sentimental items like a grandfather’s pocket watch or a handwritten note.
Our team always asks the groom during the engagement session to gather his details in a small bag the night before. On the wedding morning, we photograph them in the same window-lit corner we use for the bride’s items, using the same styling props and macro techniques.
Groom details photograph beautifully in a slightly more masculine styling palette. Think darker velvet backgrounds, leather textures, and wood surfaces. The watch and cufflinks in particular respond well to directional light that catches the metal.
If the groom is getting ready in a different location, coordinate with the second shooter or budget time to travel between rooms. Skipping groom details is one of the most common regrets we hear from couples after the wedding.
Boutonnieres should be photographed as soon as they arrive from the florist, before they are pinned on the jacket. A wilted boutonniere at the end of the night does not photograph well, so capture it fresh.
How to Pack a Wedding Details Box
A wedding details box is a small container the bride packs in advance with every item she wants photographed on the wedding morning. It is the single most useful thing a bride can do to ensure her detail shots go smoothly and quickly.
Here is the checklist we send to every bride before her wedding day:
Gather the dress, veil, shoes, and any undergarments you want photographed. Include all three rings, both wedding bands and the engagement ring. Add the full invitation suite, including a stamped envelope if you have calligraphy. Place your jewelry, including earrings, necklace, bracelets, and hairpiece, in small zip bags so nothing tangles.
Add your perfume and any cologne for the groom. Tuck in the vow books. Include any sentimental items like family heirlooms, a grandmother’s ring, a borrowed bible, or photographs of loved ones. Throw in a few extra ribbon pieces or fabric swatches in your wedding colors.
Hand the box to a bridesmaid or your mother the night before and ask them to keep it in a designated spot in the getting-ready room. When your photographer arrives, all you have to do is point them to the box.
This simple step routinely cuts detail photography time in half and prevents the frantic searching that derails wedding morning timelines. It also ensures that sentimental items, which are often the most easily forgotten, are documented.
Common Mistakes to Avoid With Bridal Detail Shots
The most common mistakes with bridal detail shots are forgetting items entirely, relying on harsh overhead lighting, and rushing through the styling process. Here are the pitfalls we see most often, along with how to avoid each one.
Forgetting the rings is the number one problem. The engagement ring is usually on the bride’s finger, and the wedding bands are often with the officiant or in a best man’s pocket. Ask for all three rings to be in the details box the night before. If the bands cannot be there, schedule a dedicated ring shot later in the day.
Using overhead hotel lighting instead of window light produces flat, yellow images that no amount of editing can fully rescue. Always scout the getting-ready room for the best window as soon as you arrive, and turn off overheads if natural light is available.
Skipping the groom details is a frequent regret. Brides invest in detail boxes but grooms often arrive with everything in a duffel bag. A quick conversation during the engagement session solves this.
Not having enough items to photograph is a real concern when a bride has a more minimalist style. In that case, lean on florals, the invitation suite, and borrowed styling props. Even two or three well-photographed items, styled beautifully, are better than a dozen rushed snapshots.
Forgetting sentimental items like family photographs or heirlooms happens because they are not part of the standard checklist. Always ask the couple directly during planning if there are any items with personal meaning they want documented.
Over-styling flat lays is the photographer’s mistake. Cramming ten items into one frame creates visual noise. Build smaller, cleaner compositions and create multiple images instead of one cluttered one.
Rushing through ring shots because of timeline pressure produces soft, out-of-focus images. Ring shots need macro focus and a steady hand. Budget the full 15 minutes even when you feel pressed for time.
Forgetting to coordinate with the florist for bouquet availability is a logistical issue. Some florists deliver late. Confirm delivery time the week of the wedding and have a backup plan for shooting florals later if needed.
Frequently Asked Questions
What to include in wedding detail shots?
Include the wedding dress, all three rings, shoes, jewelry, the veil, perfume, the full invitation suite, vow books, the bouquet, boutonnieres, and any sentimental items or family heirlooms. Organize everything into a details box the night before so your photographer can start shooting immediately.
How long do wedding detail shots take?
Wedding detail shots typically take 30 to 45 minutes for a complete set. A well-organized bride with a pre-packed details box can be photographed in 20 to 25 minutes, while a disorganized morning can push this closer to an hour. Budget at least 45 minutes in your timeline.
When should bridal detail shots be photographed?
Bridal detail shots should be photographed at the very start of the wedding day, immediately after the photographer arrives at the getting-ready location. This is typically the first 30 to 45 minutes of coverage, before the dress goes on and the energy of the room shifts.
Do I really need groom detail shots too?
Yes. Groom detail shots are just as important as bridal detail shots and are one of the most commonly overlooked parts of a wedding gallery. Include the suit on a hanger, dress shoes, tie or bow tie, cufflinks, watch, cologne, boutonniere, and any sentimental items.
Wrapping Up Bridal Detail Shots
Bridal detail shots are what turn a wedding gallery from a record of events into a complete story of the day. They capture the items you spent months choosing and the heirlooms that carry generations of meaning. Treat them with the same care as your ceremony and portrait coverage.
Pack a details box, choose a getting-ready room with great window light, budget 45 minutes, and do not skip the groom. If you are working with a photographer who understands the value of these images, the result is a wedding album you will treasure for the rest of your life.
If you are planning a wedding and want to talk through your detail shot checklist with our team, reach out through our contact page. We are always happy to walk couples through exactly what to gather and how to prepare for a stress-free wedding morning.